 ...July
3, 2017...
...July
3, 2017...
... High Pass Sharpening with light/dark Halo control ...
For the nature/landscape photography I prefer, I like to use multiple and
sequential High Pass sharpening at various blur radius to increase
contrasts for small, medium, and large image area details but miss
the light/dark Halo controls that other PWP7 sharpening transforms
have.
At present I use a sequential PWP7 “snippet”
*.wfl but cannot incorporate a Halo control until after the *.wfl
process using Composite-Blend with an original image and the workflow
output image and a Halo control mask.
More detail as to
what I do currently:
High Pass sharpening, single or multiple
passes used for:
1) small detail [adjustable 1 to 5 Blur
radius, perhaps 3],
2) medium detail [adjustable 5 to 15
blur radius, perhaps 10], and
3) local contrast enhancement
[adjustable 15 or greater blur radius, perhaps 40]
At present, preferred sequence for multiple passes is 2), 1), and finally 3). Sometimes
2), then 1) can be serially performed as describe in step ...1) and its Option2 below.
Proposed: High Pass sharpening with light/dark Halo
control; 0 to 100 Threshold; 0 to 256 Blur Radius; Composite Soft
Light or Hard Light blending; and optional Luminance channel High
Pass with Soft or Hard Light blending to avoid color changes.
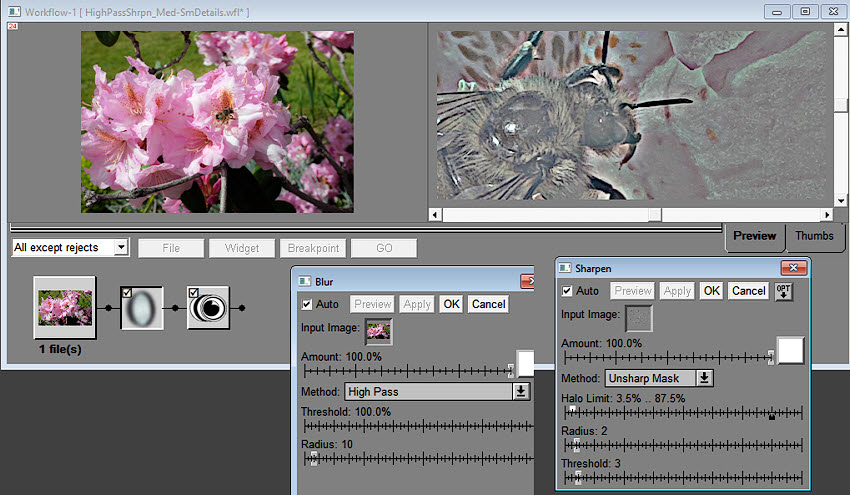
A Single-Pass Manual work flow steps using PWP7 where Img0 = starting
image for medium and included optional small detail sharpening:
...1) Click on Img0 and open the Blur-High Pass transform creating “Img1-RGBcolor” with preferred settings. Option1: Extract Img0’s Luminance channel and create a preferred Blur-High Pass image version, “Img1-Luminance”. Perhaps for medium detail: Amount = 100; Threshold = 100; and Radius = 10.
Option2: add-in Small Detail edge contrasts by clicking on either the "Img1-RGBcolor" or Img1-Luminance" High Pass image version and open Sharpen-Unsharp Mask with initial settings: Amount = 100; Light Halo = 3.5; Dark Halo = 87.5; Radius = 2; and Threshold = 3... ...increase the Threshold setting if interpolation artifacts appear especially in large low contrast image areas like sky/clouds.
 |
...2) Click on either Img1 versions and open/lower-left Apply Add a Mask Tool-Brightness stair step Curve [0,0] [50,0] [50,100] [100,100]… …click OK or leave mask ‘active’. Mask white = light Halo amount control and Mask black = dark Halo amount control.
Hint: OPT-Load a previously saved curve file whose text version is:
Curve
1.0
npts 2
style step
histexpand 0
point 0 0 0
point 1 128 255
end
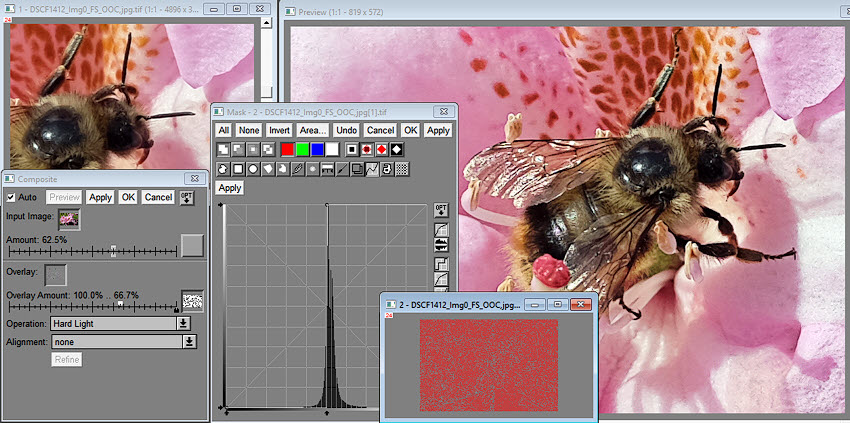
...3)
Click on Img0 and open Composite-Hard Light or Soft Light where:
Input = Img0; Overlay = either Img1 versions, Overlay Amount Mask = the resulting ...2)
mask. Perhaps Input Amount = 50; Overlay Mask white Amount
= 20; Overlay Mask black Amount = 100; and
Operation = Hard Light, often preferring Soft Light depending upon
desired ambience.
...4)
Adjust the Composite transform settings to preference while
monitoring an updating Preview. Click Apply or OK.
 |
...5) Click on the resulting ...4) image and repeat ...1) through ...4), if preferred, selecting a different High Pass blur radius in step ...1).
. . .Mouse On and Off the image to compare the resulting step ...4) image and Img0. . .

Img0 is an out-of-camera, full-sized Fuji X100T jpeg. |
© IMAGEs
by DEN
2017 -- All
rights reserved.